
Docs
Deploy on a 2-core / 4 GB VPS with Tailscale and QQ
Install an exact source candidate, keep the Host private and persistent, and verify real QQ group replies after restart.
This walkthrough follows a real Ubuntu 26.04 deployment: verify SSH, join an existing tailnet, install a complete source-built product, keep its Host running under systemd, create a PersonaBot, and connect an independent official QQ Bot App. It includes a fresh group reply after Host restart. You can follow the text without watching a video.
Candidate walkthrough, reviewed in PR #1443. The deployed product is 1.2.1-vps.20261012.sha031a14db, built from merged source 031a14db43af5b3bf52e76b01c30e27828e6e9c9. At qualification time, npm deepseekbot@1.2.0 supplied botharness-profile but not the business deepseekbot CLI used below. Do not substitute the stable npm package for this candidate. The original-group A/B image and native binding clip are public; the complete tutorial film remains pending. The two group replies were confirmed by the Human and correlated with canonical records.
Before starting
You need a confirmed VPS with cloud-console access, a local OpenSSH client, an existing Tailscale account and permission to join its tailnet, a usable model API key, and an official QQ Bot App with a designated test group. Check your current application/testing qualifications in the QQ official platform; this deployment does not establish another account's eligibility. QQ account login, device approval and initial application credentials are Human steps.
Build the product on a development machine with Node 24.21.0 and pnpm 12.4.2. The destination uses DSH 0.2.0-rc.1 and qualified IM Provider revision 602baa37fa327f7069545aaadbbd34db8a8f4636. Plan separate sessions for infrastructure, installation, model verification and QQ testing; cloud-account approval time is variable.
All addresses, keys, AppIDs and group numbers below are placeholders. Inspect existing services before choosing paths and ports. This example reserves only:
| Resource | Tutorial example |
|---|---|
| Application directory | /opt/botharness/seo-tutorial |
| Runtime user | bh-seo |
| Writable DSH home / Profile | home/dsh / seo-tutorial |
| systemd unit | botharness-seo-tutorial.service |
| Host listener | 127.0.0.1:31971 |
| Tailnet HTTPS route | An unused HTTPS 443 route to that listener |
1. Confirm the machine and authorize SSH
In the confirmed instance's cloud console, run:
whoami
hostname
cat /etc/os-release
nproc
free -m
df -h /
swapon --show
ss -lntup
systemctl --type=service --state=running
command -v docker >/dev/null && docker ps
Check the cloud instance identity, region, billing period and actual OS. Our machine reported Ubuntu 26.04, two CPUs, approximately 3654 MiB visible memory and a 60 GB cloud disk. Preserve existing applications and distro repositories; do not replace them with Ubuntu 24.04 repositories.
On your development machine, generate a dedicated key with ssh-keygen -t ed25519 -f <private-key-path>. Keep the private key there. In the console, under the intended SSH account, append its public key while preserving existing entries:
set -eu
umask 077
mkdir -p "$HOME/.ssh"
chmod 700 "$HOME/.ssh"
touch "$HOME/.ssh/authorized_keys"
key='ssh-ed25519 REPLACE_WITH_YOUR_PUBLIC_KEY tutorial-client'
if ! grep -qxF -- "$key" "$HOME/.ssh/authorized_keys"; then
  printf '\n%s\n' "$key" >> "$HOME/.ssh/authorized_keys"
fi
chmod 600 "$HOME/.ssh/authorized_keys"
printf 'KEY_OK\n'
ssh-keygen -lf /etc/ssh/ssh_host_ed25519_key.pub
Collect an ed25519 Host-key candidate with ssh-keyscan -t ed25519 <confirmed-host> into a temporary file. Compare ssh-keygen -lf <candidate-file> with the trusted console fingerprint. Save the matching key to your dedicated known_hosts file only after comparison. Keyscan alone is not authentication. Then prove a real command response:
ssh -F none -i <private-key-path> -o IdentitiesOnly=yes \
  -o UserKnownHostsFile=<verified-known-hosts> \
  -o StrictHostKeyChecking=yes -o BatchMode=yes \
  <verified-user>@<confirmed-host> whoami
Keep usernames, addresses and fingerprints in private deployment notes. Windows readers can use OpenSSH from PowerShell; replace shell placeholders with their own quoted paths.
2. Join Tailscale and verify actual communication
Use the official Linux installation instructions for the OS you just inspected. Our installation used the official OS-detecting script and installed Tailscale 1.104.1:
curl -fsSL https://tailscale.com/install.sh -o /root/tailscale-install.sh
sha256sum /root/tailscale-install.sh
sh /root/tailscale-install.sh
tailscale version
sudo tailscale up
Pause recording before tailscale up. Have the Human use its temporary login link, select the existing tailnet and complete any device approval. Do not record the link. After approval, set the intended name and inspect the selected device privately:
sudo tailscale set --hostname=deepseekbot-internal
tailscale ip -4
From a development machine already on that tailnet, run tailscale ping <new-device-name> and the strict SSH command from step 1 using its tailnet address. Compare that address's Host-key candidate with the same console fingerprint before adding it to the dedicated file. Successful agent heartbeat or device listing is not a substitute for ping and SSH command responses. This uses ordinary OpenSSH over Tailscale; it does not require enabling Tailscale SSH, routing or an exit node.
3. Build the complete source candidate off the VPS
In a new development checkout:
git clone https://github.com/BotHarness/DeepSeekBot.git botharness-product
cd botharness-product
git checkout 031a14db43af5b3bf52e76b01c30e27828e6e9c9
node --version
pnpm --version
pnpm install --frozen-lockfile
pnpm build
git clone https://github.com/DoodleBears/dsh-im.git qualified-provider
git -C qualified-provider checkout 602baa37fa327f7069545aaadbbd34db8a8f4636
cd qualified-provider
npm ci --ignore-scripts
cd ..
node scripts/product-artifacts.mjs \
  --output .humanlayer/product-candidate \
  --provider-source qualified-provider \
  --version 1.2.1-vps.20261012.sha031a14db
Use the existing verified packager. It produces Core, Client, browser, computer, Provider and application Bundle archives plus artifacts.json. A standalone npm pack of a workspace directory is insufficient. Read the source Profile installation guide and native DSH packaging reference for composition boundaries.
Prepare the installer from the publicly reviewable helper revision; this revision is separate from the deployed product source:
cd ..
git clone https://github.com/BotHarness/DeepSeekBot.git botharness-helpers
git -C botharness-helpers fetch origin codex/1438-vps-qq-tutorial
git -C botharness-helpers checkout ac30b3a4fc41a2882b3ea417bddd486fc4c22465
mkdir installation-kit
for helper in install-source-profile packaged-profile product-artifacts dev-im-provider dev-package-manager; do
  cp "botharness-helpers/scripts/$helper.mjs" installation-kit/
done
tar -czf product-candidate.tar.gz -C botharness-product/.humanlayer/product-candidate .
sha256sum product-candidate.tar.gz
Transfer the archive and kit using the same verified SSH identity and Host-key policy. For example, use scp -F none -i <private-key-path> -o IdentitiesOnly=yes -o UserKnownHostsFile=<verified-known-hosts> -o StrictHostKeyChecking=yes -o BatchMode=yes product-candidate.tar.gz <verified-user>@<tailnet-host>:/root/product-candidate.tar.gz, and the same options with -r installation-kit to /root/installation-kit. Record and compare the archive digest on the VPS before extracting. Your build's digest must match your transferred archive, not another machine's rebuild.
4. Install pinned tools and a fresh Profile
Run these destination commands as the verified administrator, after checking that the example directory and runtime user do not exist:
set -eu
umask 077
base=/opt/botharness/seo-tutorial
test ! -e "$base"
if getent passwd bh-seo >/dev/null; then exit 1; fi
apt-get update
apt-get install --no-install-recommends -y ca-certificates curl git xz-utils build-essential python3
if test ! -e /opt/botharness; then install -d -m 755 /opt/botharness; fi
mkdir -p "$base/toolchain" "$base/artifacts" "$base/evidence"
chmod 755 "$base" "$base/toolchain" "$base/artifacts"
useradd --system --create-home --home-dir "$base/home" --shell /usr/sbin/nologin bh-seo
runuser -u bh-seo -- test -x /opt/botharness
mkdir -p "$base/home/dsh"
chown -R bh-seo:bh-seo "$base/home"
chmod 700 "$base/home" "$base/home/dsh"
cd "$base/toolchain"
curl -fSL https://nodejs.org/dist/v24.21.0/node-v24.21.0-linux-x64.tar.xz -o node-v24.21.0-linux-x64.tar.xz
curl -fSL https://nodejs.org/dist/v24.21.0/SHASUMS256.txt -o SHASUMS256.txt
grep ' node-v24.21.0-linux-x64.tar.xz$' SHASUMS256.txt > node-checksum.txt
test "$(wc -l < node-checksum.txt)" = 1
sha256sum -c node-checksum.txt
tar -xJf node-v24.21.0-linux-x64.tar.xz --strip-components=1
export PATH="$base/toolchain/bin:$PATH"
npm install --global --prefix "$base/toolchain" pnpm@12.4.2 @deepseek-ai/dsh@0.2.0-rc.1
chmod -R a+rX "$base/toolchain"
node --version
pnpm --version
dsh --version
The parent directories and public toolchain must be readable and traversable by bh-seo; the runtime home, credential store and administrator evidence directory retain mode 0700.
These Node commands are for the verified x86-64 machine. Use the matching official archive for another CPU architecture. Keep the transferred files outside the runtime home, verify the archive digest, and extract into the new artifacts/source-candidate directory. Install the five helpers' yaml@2.9.1 and semver@7.8.5 dependencies, then grant the runtime user read/traversal access to the kit and nonsecret artifacts:
printf '%s  /root/product-candidate.tar.gz\n' '<your-development-machine-sha256>' | sha256sum -c -
mkdir /opt/botharness/seo-tutorial/artifacts/source-candidate
tar -xzf /root/product-candidate.tar.gz -C /opt/botharness/seo-tutorial/artifacts/source-candidate
cp -R /root/installation-kit /opt/botharness/seo-tutorial/installation-kit
cd /opt/botharness/seo-tutorial/installation-kit
npm install --ignore-scripts --no-audit --no-fund yaml@2.9.1 semver@7.8.5
chmod -R a+rX /opt/botharness/seo-tutorial/installation-kit /opt/botharness/seo-tutorial/artifacts/source-candidate
cd /opt/botharness/seo-tutorial/home
runuser -u bh-seo -- env \
  DSH_HOME=/opt/botharness/seo-tutorial/home/dsh \
  PATH=/opt/botharness/seo-tutorial/toolchain/bin:/usr/bin:/bin \
  node /opt/botharness/seo-tutorial/installation-kit/install-source-profile.mjs \
  --home /opt/botharness/seo-tutorial/home/dsh --profile seo-tutorial \
  --artifacts /opt/botharness/seo-tutorial/artifacts/source-candidate \
  --dsh /opt/botharness/seo-tutorial/toolchain/bin/dsh
The helper initializes a native custom web Profile, installs the packaged Bundle and verifies all six components. It refuses to overwrite an existing Profile. Inspect a partial failure before recovery. Keep a direct source checkout on the VPS at the same exact product SHA if desired; the runtime uses the installed artifacts, not an unbuilt workspace. Monitor free -m during installation instead of running concurrent full builds on this small machine.
5. Keep the loopback Host running
Inspect the installed CLI's --help and web --help. The qualified root launcher accepts the following flags. Replace tutorial.example.ts.net with your exact device DNS name and create a new unit at /etc/systemd/system/botharness-seo-tutorial.service:
[Unit]
Description=DeepSeekBot tutorial
After=network-online.target tailscaled.service
Wants=network-online.target

[Service]
Type=simple
User=bh-seo
Group=bh-seo
WorkingDirectory=/opt/botharness/seo-tutorial/home
Environment=DSH_HOME=/opt/botharness/seo-tutorial/home/dsh
Environment=PATH=/opt/botharness/seo-tutorial/toolchain/bin:/usr/local/bin:/usr/bin:/bin
ExecStart=/opt/botharness/seo-tutorial/toolchain/bin/dsh --profile seo-tutorial --host 127.0.0.1 --port 31971 --trusted-host tutorial.example.ts.net --no-open
Restart=on-failure
RestartSec=5
UMask=0077
StandardOutput=append:/opt/botharness/seo-tutorial/home/dsh/host.log
StandardError=append:/opt/botharness/seo-tutorial/home/dsh/host.log

[Install]
WantedBy=multi-user.target
systemctl daemon-reload
systemctl enable --now botharness-seo-tutorial.service
systemctl is-active botharness-seo-tutorial.service
ss -lntp '( sport = :31971 )'
Verify the listener is loopback-only. The Host log contains a private Owner login URL: stop recording before inspecting it, protect it, and do not publish it. Use the installed Host's actual Owner token for login; do not disable authentication. For CLI use, store only that token in home/dsh/owner-token, owned by bh-seo with mode 0600. Refresh it after a restart if this Host issues a new token. Do not put it in command arguments.
6. Open tailnet HTTPS and sign in
Inspect tailscale serve --help and tailscale serve status --json. Proceed only if the intended HTTPS route is unused; preserve any existing routing. On our fresh device:
tailscale serve --bg --https=443 --yes http://127.0.0.1:31971
Use your actual HTTPS device URL on a client in the same tailnet, and complete native Owner login with recording paused. Check that the Web Client is usable and the authenticated native API works. A 401 without authentication is expected. This is a tailnet-only entrance; tutorial readers must join their own tailnet on both devices. See the Serve reference.
7. Configure the model and create the tutorial PersonaBot
From an administrator shell on the VPS, define the installed business CLI:
base=/opt/botharness/seo-tutorial
cli=$base/home/dsh/profiles/seo-tutorial/node_modules/deepseekbot/dist/deepseekbot.mjs
live() {
  runuser -u bh-seo -- env DSH_HOME="$base/home/dsh" PATH="$base/toolchain/bin:/usr/bin:/bin" \
    node "$cli" "$@" --host http://127.0.0.1:31971 --token-file "$base/home/dsh/owner-token"
}
With recording stopped, feed your model key to secret-put through trusted stdin under this runtime user's DSH_HOME. Use hidden input or a protected local file; the command never accepts the value in argv. This writes the native credential reference DEEPSEEK_API_KEY. See the business CLI guide for stdin semantics.
In Bash, with command tracing disabled:
set +x
read -rsp 'DeepSeek API key: ' tutorial_model_key
printf '\n'
printf '%s' "$tutorial_model_key" | runuser -u bh-seo -- env \
  DSH_HOME="$base/home/dsh" PATH="$base/toolchain/bin:/usr/bin:/bin" \
  node "$cli" secret-put DEEPSEEK_API_KEY
unset tutorial_model_key
Check the current native model catalog before choosing routes. The real deployment qualified this preset:
live model-preset-create --name 'SEO Tutorial DeepSeek' \
  --orchestrator-provider deepseek-official --orchestrator-model deepseek-flash --orchestrator-effort low \
  --assignment-provider deepseek-official --assignment-model deepseek-flash --assignment-effort low
live create --name 'VPS SEO Tutorial Bot' \
  --description 'Dedicated VPS and QQ tutorial Bot' \
  --persona 'Help with deployment. For verification requests, reproduce the requested marker exactly.' \
  --preset <id-returned-by-model-preset-create>
printf 'Please reply only TUTORIAL_DM_A_OK' | live send <new-bot-id> --body-stdin
Use the actual returned IDs. Verify a correlated committed reply to this fresh request, then open the same Bot's DM in Web and inspect the matching message. A provider configuration or accepted send alone does not prove model usability.
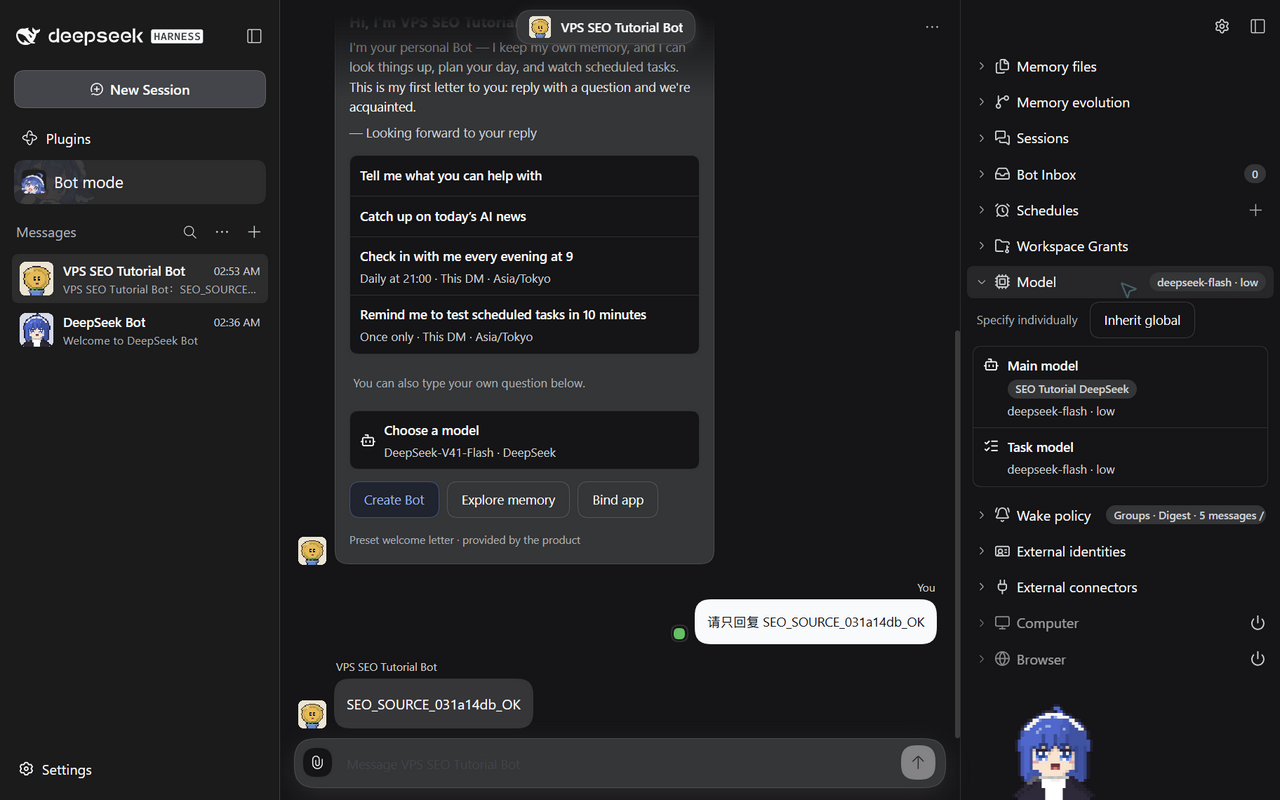
Actual 1280 × 800 capture, 2026-10-11 17:55 UTC. The bottom reply matches the source-version marker; the larger welcome card is preset product text.
8. Connect an independent QQ App and bind this Bot
For Tencent registration, official App creation, group setup and mobile permissions, follow the illustrated QQ connection guide. This deployment reuses an existing independent QA App.
Reserve a dedicated official App and test group. Confirm that no other Host on any machine is receiving this App. Do not use personal-account automation or add a second receiver for a production App.
For initial authorization of an existing App, use Settings → IM bots → QQ → Manual setup. With recording paused, the Human fills AppID and AppSecret in the native form and clicks Connect. Verify the real application identity. The qualified Provider's QR flow creates a Bot; it is not the reuse path for an existing App. Current platform access requirements must be checked in the official authentication documentation.
When the selected App already has native authorization in a stopped Profile, use the QQ QA CLI reuse guide. Its developer helper can claim QA1/QA2/QA3, read only the selected QQ credential, and connect over strict SSH to remote loopback without asking the Human to enter its Secret again. It retains the destination Profile across branches. This is not a public deepseekbot im-authorize qq command.
After either authorization path, open the tutorial Bot's External identities, choose that authenticated QQ App and bind it. Native Provider authorization and application-defined Bot Binding are separate operations.
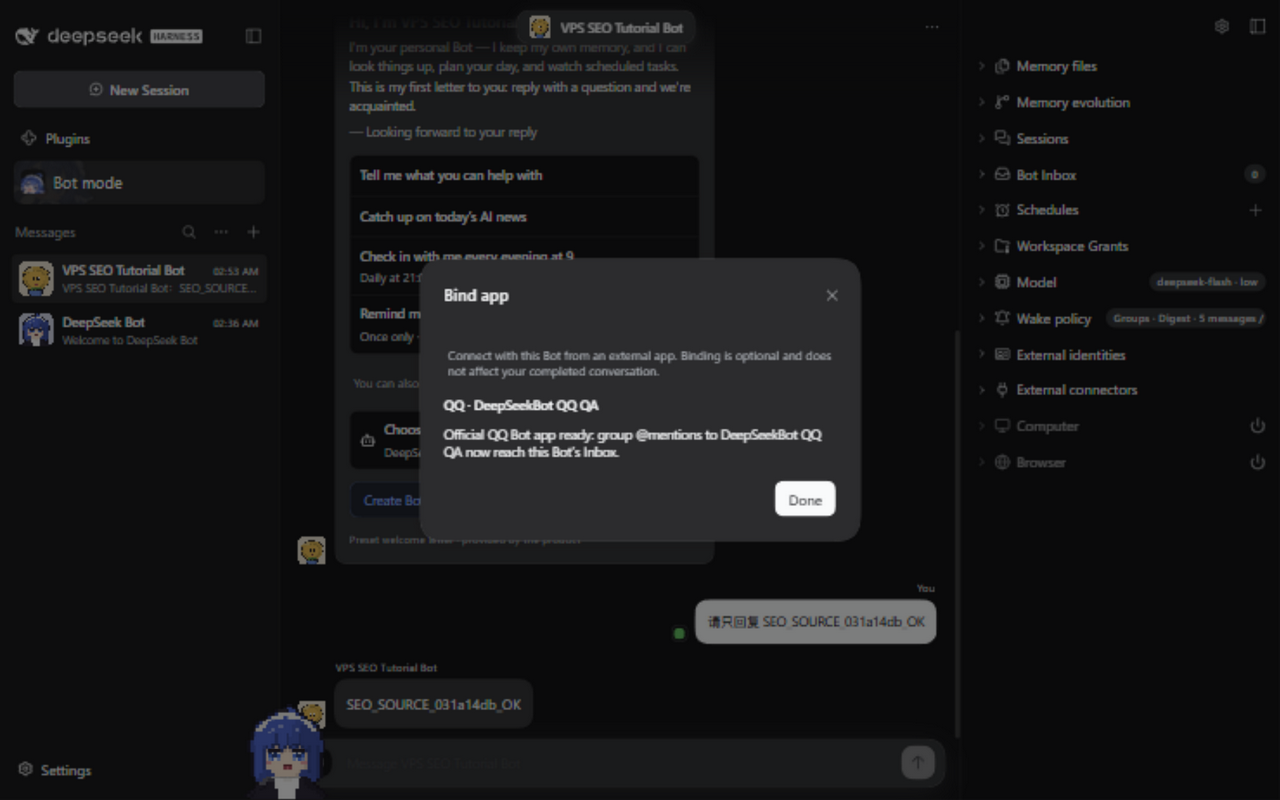
Actual 1280 × 800 native Web capture, 2026-10-11 18:10:31 UTC. No Secret or QR code is shown. This verifies binding readiness; it is not an original-group reply image.
9. Verify QQ replies before and after restart
In the designated QQ group, a Human or authorized test account must @mention this App with a fresh unique marker. Our first request was “请只回复 SEO_QQ_QA1_20261012_A_OK”. The Human confirmed the exact visible reply in the original group. We correlated its QQ Source Event with the handled Inbox Admission and provider-accepted Outbox intent and receipt.
Restart only this tutorial unit, refresh the private Owner token if needed, and inspect the same Bot and native QQ App:
systemctl restart botharness-seo-tutorial.service
systemctl is-active botharness-seo-tutorial.service
live im-apps
Verify the Bot, model settings, authorization and Binding persist. Send a new group @mention, such as “请只回复 SEO_QQ_QA1_20261012_B_OK”. The Human confirmed that exact reply too. Its source and outbox records were distinct, created after restart and associated with the same native QQ conversation. Old process evidence cannot stand in for this new send.
The public bounded acceptance summary omits group IDs, Source locators, credentials and machine addresses. The Human supplied an original-group image containing both requests and replies. The public derivative only crops the view and covers personal identity; no message text is changed. No original-group video is claimed.
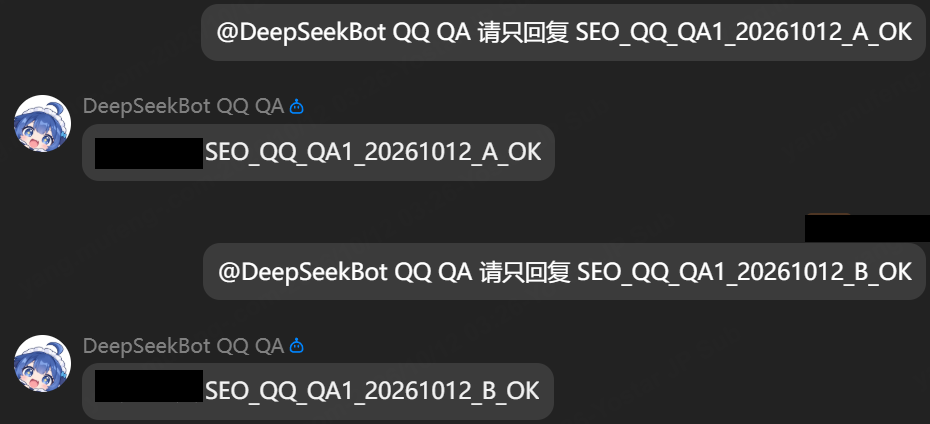
Original-group evidence received on 2026-10-12 JST; exact processing and digests are in the asset inventory.
Troubleshooting and maintenance
| Symptom | Check and next action |
|---|---|
| SSH Host-key mismatch | Compare against the selected cloud console; investigate identity changes before trusting another key |
| Tailscale device listed but unreachable | Verify device approval, the intended tailnet, ping and actual strict SSH response |
| Installer refuses an existing Profile | Choose a genuinely new Profile or follow a qualified update/backup workflow; do not delete existing data |
host-unauthorized |
Refresh the exact Host's private Owner token file and sign in again |
host-unreachable |
Inspect this unit and its loopback listener before changing access routes |
reply-not-produced / send-needs-repair |
Inspect this request with send-status; do not blindly resend an uncertain mutation |
| QQ connected, no group reply | Inspect authenticated App identity, Binding, test-group eligibility and a fresh @mention; correlate Source, Inbox and Outbox |
| QQ QA slot already claimed | Contact its owner, stop the exact receiver and release explicitly; claims do not expire automatically |
| Source credential reuse refuses | Inspect the selected AppID, native reference, source writer record and receiver status; do not copy the whole credentials file |
| Memory pressure during install | Transfer prebuilt artifacts and reduce this task's concurrency; inspect actual memory before drawing conclusions |
Inspect this unit's resources with systemctl show botharness-seo-tutorial.service -p MemoryCurrent -p MemoryPeak. Our pre-QQ qualification observed a unit peak near 373 MiB; installation samples still had at least 2795 MiB available. These observations do not promise a limit for other workloads or measure every installation instant.
Stop and restore only this task's receiver:
systemctl stop botharness-seo-tutorial.service
systemctl is-active botharness-seo-tutorial.service
systemctl start botharness-seo-tutorial.service
After restoration, refresh native Owner login if needed and repeat a new real DM and group mention. To remove the task's HTTPS route, inspect the installed Serve help and current routing before turning off only its HTTPS 443 handler; do not reset other routes. Preserve the task home and native credentials. Back up the stopped Profile privately before an update; database rollback requires a compatible writer or its pre-upgrade backup.
Supplemental actual recordings
The blank native QQ Manual setup recording and bilingual transcript supplement the binding clip. The fresh final-source isolated Profile transcript and original timing, captured at 19:58 UTC on 2026-10-11, show actual OS, resources, tool versions, unit status and six-component verification. This later installation on the provisioned VPS did not start a second Host or QQ receiver.
Evidence and publication checklist
The actual deployment used strict SSH, a tailnet-only HTTPS Web Client, native Owner authentication, a dedicated unit, real model replies and two real QQ group replies. Capture provenance identifies versions, UTC times, digests and the limited meaning of each public image.
The repository's former user-guide routes redirect to the DeepSeekBot product site. Verify that site's English and Chinese destination pages when publishing this new guide; this PR prepares source documents and redirects, not a live tutorial-page deployment.
The actual installation and source-update terminal output/timing has been reviewed and published unchanged with digests. The native QQ binding recording includes a 17-second MP4, English and Chinese subtitles, chapters, an equivalent transcript and digests. All 516 frames were inspected; the complete original video payload is preserved. It shows binding readiness, not original-group replies. Other browser clips and the complete tutorial film remain pending. Pause before login URLs, Owner tokens, model keys, QQ Secrets, QR codes and account lists. Publish only reviewed footage with unrelated conversations and machine identifiers removed. The full tutorial media deliverable remains tracked by issue #1438.